The pattern pane Beta
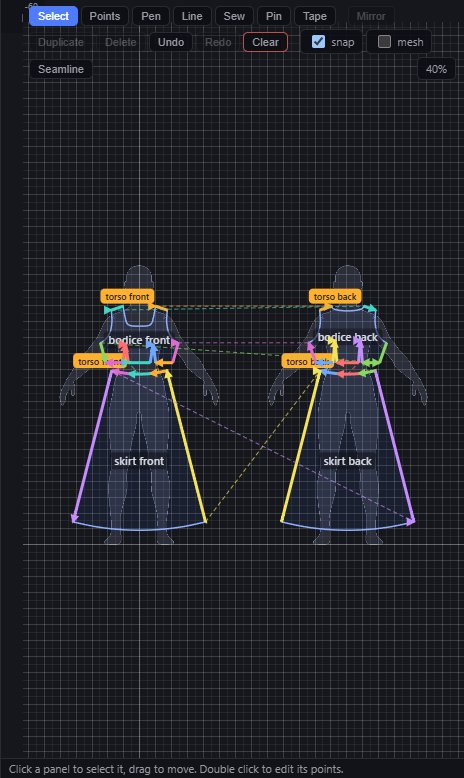
The pattern pane is the drawing table beside the 3D view. Every garment is a set of flat panels in centimetres. You draw them here, sew their edges, and say where each one starts round the body.
Moving around the pane
- The wheel zooms at the cursor. The middle mouse button, or Space+drag, pans.
- Double click empty space, or press F with no seam selected, to fit every panel in view.
- Drag the divider between the pane and the 3D view to make the pane wider or narrower.
- The body is drawn faintly behind the grid: from the front for front panels, and mirrored for the back.
- The status line at the bottom shows the cursor position in cm and a hint for the tool you hold.
The toolbar
| Tool | Key | What it does |
|---|---|---|
| select | V | Click a panel to select it, Shift+click to add or remove. Drag empty space for a box. Drag a panel to move it; hold Shift to keep to one axis. Click a seam, pin or internal line to select it. Double click a panel to edit its points; double click its name to rename it. |
| points | A | Drag a point or a handle. Click the outline to add a point; Delete removes the chosen one. Double click a point to switch between corner and smooth. Dragging a handle mirrors the other one; Alt+drag breaks that. A panel keeps at least three points. |
| pen | P | Draws a new panel. Click for corners, drag for a smooth point. Click the first point, press Enter or double click to close. Backspace drops the last point, Esc cancels. |
| line | L | An internal line: a stitch line inside a panel, like a puffer's quilting. The cloth is pinched along it and puffs between lines when the fabric has Puff. Click inside a panel, click to add points, double click or Enter to finish. |
| sew | S | Click an edge on one panel, then the edge it sews to. Shift+click (or Shift+S) sews a free span: start and end on one side, then start and end on the other. |
| pin | N | Click inside a panel to pin that spot to the body under it when it drapes. |
| tape | M | Click two points to measure the distance in cm. |
| mirror | Ctrl+M | Mirrors the selected panel across its left side: a linked copy, drawn dashed, with its seams mirrored too. Edit the source and the copy follows. Right click the copy and Unlink from its source to edit it on its own. |
| duplicate | Ctrl+D | Copies the selection, a little to the side, with its material and arrangement. |
| delete | Delete | Deletes the selected line, seam, pin or panels. |
| undo, redo | Ctrl+Z, Ctrl+Y | Up to 100 steps. |
| snap | Snaps points and moves to a 0.5 cm grid. On by default. | |
| mesh | Shows the triangle mesh the simulation will use. | |
| seamline | Draws every seam on the garment in the 3D view, in the same colour as in the pane, following the cloth. Selected seams turn white. | |
| clear | Removes every garment on the character: panels, seams, pins and cache. It asks first and cannot be undone. |
Other keys while the pane has focus: Ctrl+A selects every panel, the arrow keys nudge the selection by 0.1 cm (1 cm with Shift), and Esc cancels a draft, then goes back to select, then clears the selection.
Draw a panel
- Press P, or Draw a panel in an empty pane.
- Click to place each corner. Press and drag a little to make a smooth point instead.
- Close the shape: click the first point, press Enter or double click. An outline that crosses itself turns red and is refused: move a point first.
- The new panel is called panel N and wears the garment's first material. Double click its name to rename it.
Sew two edges
- Press S. The edge under the cursor lights up and the status line gives its length.
- Click the first edge. An arrow shows its direction.
- Click the edge it sews to. It can be on the same panel, but not the same edge. The status says Sewn with the lengths.
- If the cloth twists along the seam later, select the seam and press F to flip its second side.
Right click a panel
Rename, Mirror (or Unlink from its source on a copy), Duplicate, Hide or Show, Delete, Arrange on with every place round the body, and Material when the garment has more than one.
Panels and groups
The panels group on the left lists every panel: an eye to show or hide it, its name, its material, its arrangement tag and × to delete it. A red row is a panel that cannot be meshed: its outline crosses itself or it is too small.
| Control | What it does |
|---|---|
| + group | A new group with the selected panels in it. Drag rows onto a group, or right click a row and Move to group. |
| Group header | Show or hide every panel in it, select them all (then move them together in the pane), give them one fabric, or delete the group. Its panels stay, ungrouped. |
| Mesh edge | This panel's own mesh size in cm, 0.5 to 8: smaller is finer. Empty follows the quality setting. Not used when the simulation is set to Uniform. |
Seams
The seams list groups seams by the two parts they join. Each row shows its colour, the two panels and both lengths, with ⇄ to flip it and × to delete it. A group header selects, flips or deletes every seam in it. An amber dot marks a group with a seam that gathers.
Arrangement
Arrangement says where the selected panel starts before it is sewn: on which part of the body, on which side, and how far out. The body is read as simple rounded volumes, one per part.
| Control | What it does |
|---|---|
| On | The body part: nowhere (flat), torso, head, left arm, right arm, left leg or right leg. |
| Side | Front, back, left or right of that part. |
| Turn | Turns the panel round the body part, in degrees. |
| Height | Up or down along the part, in cm. |
| Distance | How far from the skin it starts, 0.5 to 15 cm. Default 4. |
| Bend | How much it wraps round: 0 flat, 1 round. Default 0.6. |
| Rotate | Turns the panel in its own plane, in degrees. |
| Flip | Mirrors the panel left to right where it lands. |
While the pane is open, teal dots sit on the body in the 3D view, one for each place a panel can go. With a panel selected, click a dot to put it there. A mirrored copy always lands opposite its source.